Thursday 22 August 2013

To thatch, or not to thatch....?

Or perhaps more to the point - how to thatch?

The house in question is big and once upon a time was very hairy.... 
   
I bought it at an auction more years ago than I care to remember and I have always suspected that it was made by a man with more enthusiasm than knowledge of thatching.   One day his wife almost certainly lost patience with the constant clearing up of the straw that was being shed all the time from that very hairy roof and I imagine that she snapped at him "It's the house or me - get rid of it!"

Inside and out are both delightful and the only other flaw was the extraordinary chimney.  Although the house is big and unwieldy, it's fairly light, unlike the chimney which is made of concrete and weighs more than the whole house....

The chimney was carefully packed to bring it to the Czech Republic, not because we actually wanted to keep it - it wavered dangerously at the back of the house, threatening to fall off every time we needed to shift the whole thing, so in the end we wrenched it off - but because we planned to use it as a pattern for the new chimney, due to be made of chunky polystyrene.

When Butterfly and I were working on the houses from March to May this year we had a lot of help from our friends and family, as followers of our blogs will know.   However I haven't yet revealed that we actually had a little list, in four columns, headed "Unskilled", "Semi-Skilled", "Skilled" and "Highly Skilled".   Each column had a list of tasks and another list of people.

Not many made it onto the "Highly Skilled" list (I wouldn't place myself on it, though Butterfly would qualify).   One person who did get onto it is a very old friend of mine from Holland, who is a retired art and craft teacher and who, together with the rest of her family, restored their full-size 17th century house in Dordrecht.   I know from years of experience that Irmel can turn her hand to anything.

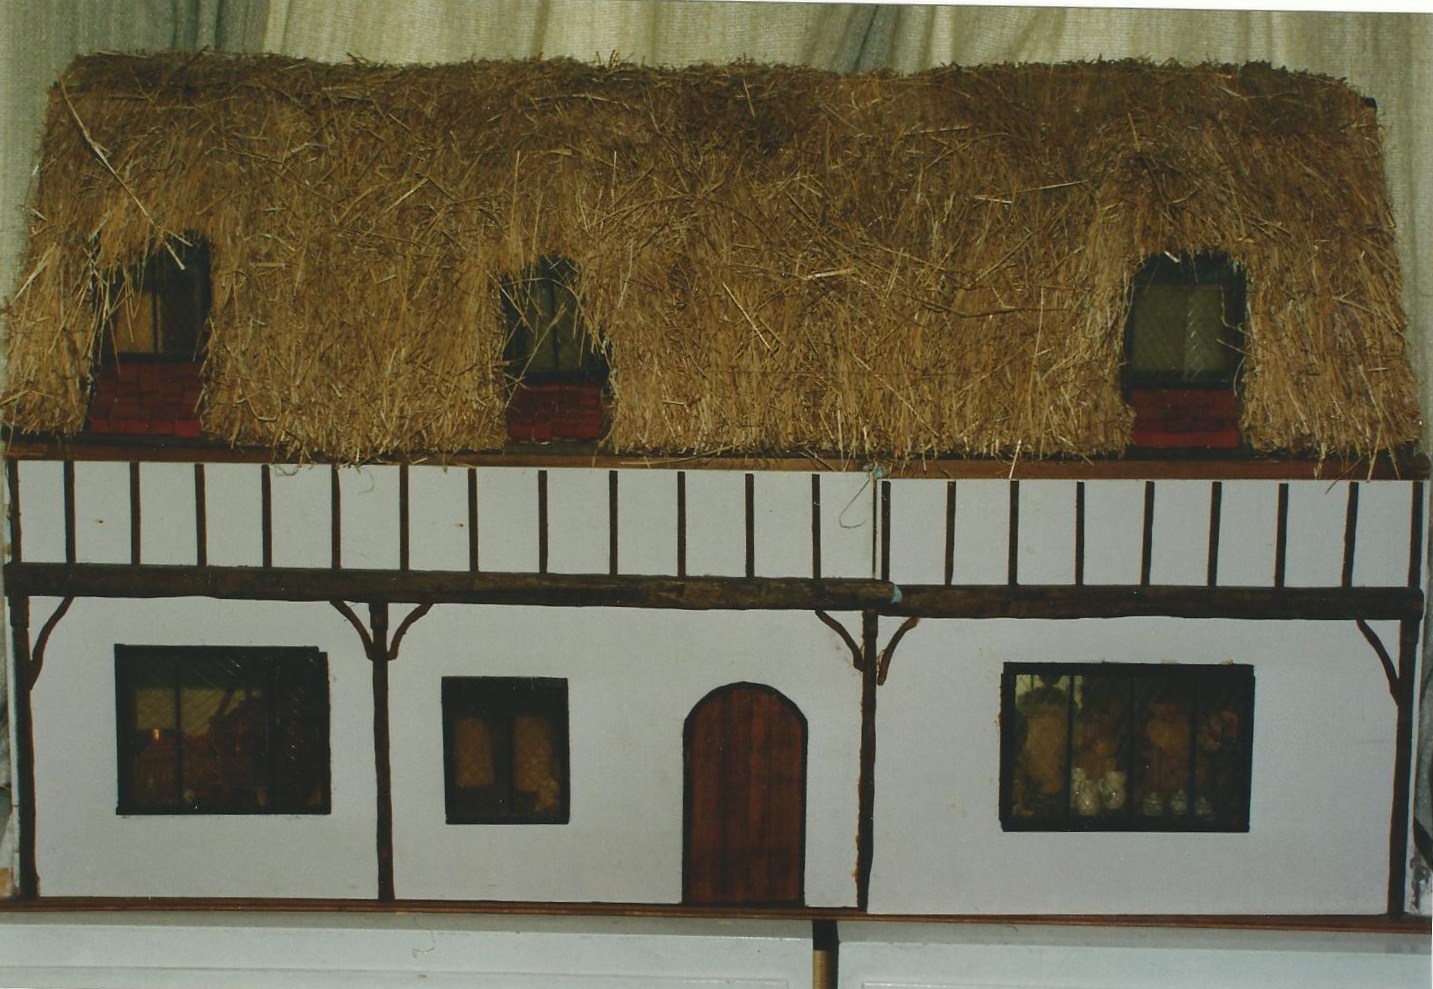
I was delighted when she agreed to come to Bavorov for just over a week, to help with the setting up of Small Worlds.   Because on the Highly Skilled list was the task of rethatching the large cottage.   Every time Butterfly or I glanced across at it, we sat back happily thinking "We can leave that to Irmel...."

She came with an added bonus - a friend from their archaeology group who, it turned out, is a problem-solver par excellence.   I was fascinated to see that Bep, who has never worked with miniatures (though clearly is used to painstaking work with old objects dug up in many pieces) would just listen to what I needed, gather up the materials, and return later with a finished item saying "Is this what you want?".  


She worked on reconstructing dolls, rebuilt and restrung puppets (seen here with the partially finished polystyrene chimney), created costumes for the dance-school-to-be, restored tiny filthy dresses which I had been ready to chuck out, and all this alongside the major work of helping Irmel with the roof. 

I had gathered up all the articles I could find in magazines and books about thatching miniature roofs.  They ranged from using brown towels, coir or plastic doormats, string, and coir bundles, right back to the straw with which we were all-too-plentifully supplied.

After a few practice runs, and much cogitation, it was decided to reject all fancy modern methods, strip the roof, comb out(!) and reuse the straw.


Unfortunately at that point perfectionist Irmel discovered, whilst stabilising the roof, that it had been badly constructed in the first place and needed an additional bay of timbers to make it secure enough to affix the panels bearing the straw.


This involved a trip to the DIY hypermarket in the next town for the appropriate wood and a number of tools that she felt were missing from my collection.   Several hundred Czech korunny lighter we returned to find that Bep had more or less perfected the technique for creating the necessary (very many) bundles of straw which were going to be fixed to the polystyrene panels.   


Butterfly had been busy digging out the fireplace area at the bottom of the chimney breast and coating the new chimney with a mix of glue, paint and polyfilla to get the right texture on it.


After successfully attaching the extra bay,


 Irmel and Bep worked out the best method of fixing the straw bundles to the painted panels.   


This involved much glue, sticky tape and general mess - old straw is not the easiest material to work with.   Apart from anything else it's quite dusty.....


Maybe we should just have left it to the thatcher on the roof?

Whilst all this feverish activity was going on I, in my turn, was not standing idly around.  I was simultaneously cleaning and doing some running repairs on the cottage, 


trying (unsuccessfully) to make a blind for the French patisserie,


and making a spa scene, complete with wisteria.  (Yes, yes, I know those are really delphiniums - but hanging upside down.....)


Sadly, time ran out on the visitors from Holland and they had to leave with only half the roof thatched.   A blessing in disguise actually because, since the house stands on a windowsill, it means that the light comes in just where one wants it.   So it's just as well that the thatcher is one of the slowest workmen I have ever met....


 I leave you with some photos of the now inhabited house.   We tell visitors to Small Worlds that it is an international commune - a typical English cottage, 


inhabited downstairs by a large community of  Czech cornhusk dolls and upstairs a couple of German wooden dolls, grossly out of scale, but matching the giant furniture up there.

 Remember you can click on the images to make them bigger.....


I hope you have enjoyed this further trip into Small Worlds - thank you for following and I look forward to seeing you again towards the end of the month when I hope to show you another display window.

Friday 9 August 2013

A-camping we will go....

Just three weeks to go before the end of the school holidays in the Czech Republic so high time to look at the last section of the "Where shall we spend our holidays?" window.

We've been down on the farm, donkeyriding on the beach and now it's time to go camping.

This was the part of the window that needed the most input in terms of things to be made from scratch so this will be a picture heavy post.   

I had very little in my collection relating to camping but I thought I could probably at the very least make a tent, using a similar technique to that needed for the sun umbrella on the beach.   I bought a conical sieve and started the dipping-material-in-a-glue-and-water-mixture process again.


While that was drying it struck me that the strawberry container holding my lunch had a shape very like our first tent, some forty years ago.  

So I found some green material and started gluing that as well......


A polystyrene wall tile also got the green treatment, turning it into a smooth meadow - I wonder why we never ended up pitching our tent on something as easy as that.   I seem to remember coping with potholes, slopes, mud, or rock hard ground.  


I then had a think about what else one might find on a campsite - a gas cooker perhaps, a barbeque, evidence of some outdoor activities, some means of lighting the essential bedtime reading...... 

A rummage in the well-stocked supply drawers of Small Worlds produced the following assortment: 


Should I perhaps at this point introduce an element of competition and ask you to guess a) what purpose these things have in real life and b) what I am intending to turn them into?   Well, you can do it informally - there are sadly no prizes for the correct answers anyway!   And I don't know what all of them are either.


I do know about the party popper though. I have been saving them for many years - as I mentioned part way through one of the early blog posts - in the expectation that one day I must be able to think of a use for them.   And on this occasion the use was obvious - a camping gas bottle.

And there too is the first transformation for the Czech curtain runner.   These are brilliant and can be turned to many purposes, though unlike some of the English versions they don't make very good taps. 

The gas bottle required a stove so step forward the old-fashioned suppositories container (I see they now come individually wrapped in neat little hygenic foil wrappers.   Not forty years ago fortunately.)   Two thirds of this three-part box had already served as a radiator and a cooker hob in a mini-bedsit, made by Butterfly when she was twelve for a school project.   Now the left-over part came into its own.   
Glued into place with some spare plastic legs, giant press studs, fridge doors (miniature ones of course) and two more of the curtain runner bits, it made a not unconvincing camping cooker.  
(Unfortunately I have to confess that the extreme heat of the past weeks beating down on the display window has meant that the glue has softened and the legs have inexorably kilted to one side, resulting in the saucepans on top slithering towards the ground every day despite my best attempts to reglue).

Whilst working on this it struck me that the beach scene had yielded some excellent fish (as one would expect from somewhere on the British coast).   The little plastic things that had been holding the backs of the beach hut photo frames in place looked remarkably fish-like.   A swift chopping of the round tails, a dab of silver pen, and there they were, all ready to go into the bucket.  

Fish in a bucket require a fishing rod to get them there.   One of the cellos (or maybe it's a double bass) in my collection of musical instruments had a bow that was completely out of scale so I added a press stud reel and glued the strings of the bow together to make a long fishing line.   I gazed at a picture of one on-line for a while but I suspect my version would not be very good for catching fishes. 


I decided I didn't want to sacrifice the rather nice lanterns which can be seen in a photo above (the one with the hairpins in) so  I had to cobble together a gaslight - two little plastic stoppers glued middle to middle, stuck to a wooden teapot minus its spout and handle solved that one, and it's perched on a pizza separator functioning as an extra camping table.

And that was more or less it.   So I will end with a few photos of the finished scene.   Sadly, once again it isn't really possible to bring you a photo of the whole window display;  I still haven't managed to work out how to cope with the reflections both of myself and the building opposite Small Worlds.   And looking through the glass is blurry anyway.


I hope you have enjoyed joining me on my summer holidays in Small Worlds - I have thoroughly enjoyed creating the scenes.  If the truth be told, this is my favourite aspect of working with tiny things - creating a scene out of the most unlikely objects (and then making visitors to Small Worlds guess what things were in "real life").   One man scored 100% in the guessing game round the museum last week and then requested his prize.   I had to rapidly look up the Czech for "I'm afraid it's just the honour of out-guessing everyone else!"

For those who enjoy statistics, I am very happy to report that we have had more than 250 adults and about the same number of children through the door since we opened on 15th June - less than two months ago.   The town museum, where one of my houses is also on display with the intention of  pointing people in my direction, can only report a total of 60 adults and about 10 children in the past three months.   I have hastily put up some posters to encourage people to head there if they have enjoyed Small Worlds.

I am gearing up towards my return to the UK at the beginning of September but before that happens I look forward to seeing you here in the not too distant future with more news of what is happening in Small Worlds - thank you for following the continuing journey.